Showing posts with label Technique Page. Show all posts

Tuesday, 12 January 2016

Technique Page - Multiple Imagery


How to do Multiple Imagery: 

For Multiple Imagery, you will need to shoot multiple images of the same or similar subject, for instance, flowers, or a person. This will need to be at least 9 images or more. Afterwards, Photoshop is needed. 
  • Once all the images have been shot, and there are at least 9 decent images, you can create a Multiple Imagery. 
  • Multiple Imageries can be in 9s, 12s, 16s etc. 
  • In Photoshop, you will need to open up all the images you have selected to use, and then will need to open a new, untitled document that is either landscape or portrait depending on whether you shot vertical or horizontal images. You will then need to divide number of images by the length/height of the page, depending on how many images there is in a row/column. This will allow you to have a space in between the images. 
  • After you have calculated this, you well then need to crop the images into the right size, so that all of them fit on to the page. 
  • By zooming into the images at 100% you will have a clear indication of how many 'squares' (which is why you need a transparent page) there are between each image, and they all need to have the exact same space between them. 
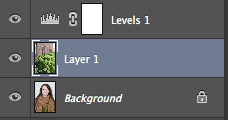
  • Once all the positioning is finished, you can then use levels and curves to adjust the colouring and brightness of the images all together, and then crop if needed around the images. 


Photoshop screenshots of the steps to create a Multiple Imagery: 


 Step 1. Select all the images you have to create a Multiple Imagery, this can be 9, 12, 16 or more images.
 Step 2. Open all the images, choosing the ones you want, and then calculate how small the images need to be in order to fit into a Multiple Imagery - for this one in particular, i have 12 images so 4 by 3, therefore the images need to be quite small.


Step 3 and 4. Crop the images to an appropriate size.   


 Step 5. Begin to open and create a new document.
 Step 6. Here I have selected the international portrait, I have then swapped the width and height measurements so that my document is landscape, and I have also made sure that the background is transparent.
 Step 7. This is the document you will need to open (or it can be portrait).
 Step 8. Drag each image you are going to use away from photoshop, so you have a clear view of all the images and the document as well.
 Step 9. Drag each individual image over to the document.
 Step 10. Here, I noticed my canvas size wasn't big enough to fit all twelve images and as i wanted 4 by 3, i now need to make the width of the document bigger.
 Step 11. Here I am changing the canvas size so that it will fit the entire Multiple Imagery.
 Step 12. Once all the images have fit into the document, I will also have to increase the canvas size again so that i can create a gap between each image.
Step 13. Here I have moved the images so that they have a gap in between each of them.
 Step 14. You will then, need to zoom in at 100% so that you can line up your images exactly, and create the gap sizes exactly the same using the squares on the background - which is why we need the background to be transparent.
 Step 15. Crop the entire image to the size you want, leaving a little room around the edges to match the gaps between the individual photos.
Step 16. Use Levels and Curves to brighten and enhance the images.
Step 17. You're done! 


This is the finished result.


Monday, 9 November 2015

Technique Page - Location Portraiture


How to do location portraiture: 

  • Location portraiture is a camera shooting technique. 
  • During this lesson, we were asked to take photos in pairs, of each other but also include depth within these shots.
  • So for example, in the shot above I positioned my model on the right side, leaving enough room to show the depth of the building on their left. 
  • You could do this with pathways, trees, streets etc. 
  • Another way to shoot location portraiture is to zoom in to a model, which will change the scale of the background, or you could get your model to move forward, so that the background stays exactly the same in each shot (if you take more than one) but your model is closer in the frame. 

Technique Page - Animation


 photo Animation_zpsu6c6omjg.gif

How to create the first animation: 


  • Take a photo. 
  • Upload it to photoshop, open up timeline, and duplicate the photo along the timeline. 
  • Then add the black and white effect, to the photos in the middle, leaving coloured images at the start and end and make sure the animation is playing slowly. 
  • This will make the colour of the image change from colour, to black and white, back to colour. 

How to create the second animation: 


  • Do the same as the one before, but make the duration of time faster. 

How to do the third animation:


  • For this, I asked a model to do a roly-poly across the grass.
  • I then used the continuous setting on my camera, which was positioned on a tripod. 
  • Whilst my model was doing the actual role-poly, I shot lots of images of each stage of the movement. 
  • I then used the same procedure above ^, but instead of using one image, I selected all the images that I shot, and then reversed the images back again. 
  • This meant that within the animation, the model would do a forward roll-poly, and go backwards as well, so the animation is continuous. 

Technique Page - Video


How to create a video within a picture: 


  • First, shoot a portrait image with a frame in the shot, my example is a model holding the frame vertically. 
  • I then set my camera to video, and shot a video, my example was a panoramic style from the same model's shoes up to his face. 
  • I then used Premiere Pro and Photoshop to edit the video within the photo, in the space of the frame.  

Thursday, 15 October 2015

Technique Page - Blur


How to do Blurring: 

  • Set your camera to Manual, ISO 200 and depending on the lighting F22. The shutter speed also needs to be quick, so between 1-4 seconds. 
  • Lighting needs to be harsh so that the blur can be seen clearly in the photograph. 
  • Set the studio up so that the lights are shining on to the subject, with a black backdrop. 
  • Make sure the subject moves quite quickly, but makes it obvious so that the blur is significant within the image. 

Thursday, 8 October 2015

Technique Page - High Key Lighting


How to do a High Key Lighting shoot: 
  • Firstly, the studio has to be set up so that there is a white background, 2 lights positioned behind polystyrene walls, reflecting on to the background, and 2 other lights reflecting the subject. Here is a light diagram to show how the set up should be: 

  • The subject can be anything from a model, food, an object etc. 
  • Depending on how bright you want the photo to be - you can increase the exposure in order to get a brighter picture. 


Thursday, 1 October 2015

Technique Page - Slow Sync Flash


How to do Slow Sync Flash:

  • To do Slow Sync Flash you will need to set your camera to 2.0+ (depending on how slow you want the shutter speed to be) second exposure, F16 and an ISO 200. 
  • The model (you can have more than one model if you wish) will need to move constantly until the camera has eventually taken the shot. This will capture the blur of their motion within the shot. 
  • The black backdrop allows the colour of the blur to be shown more clearly. 

Wednesday, 30 September 2015

Technique Page - Multiple Exposure


How to do Multiple Exposure:


  • As I did not have the use of a camera which had the Multiple Exposure setting, I had to edit the images on photoshop afterwards. Therefore, I took photos of scenery on location, such as trees, bushes, buildings, and then I took photos of models in the studio with a white background (the white background makes the editing in photoshop easier). 
  • On photoshop, I opened up my two images, one of a model and one of tree leaves for example. I then used 'white point' in either levels or curves on the photo of the model, taken in the studio, this made the background more white and brighter. 
  • I then pulled the image of the tree over the top of the first image, creating another layer, and positioned it to where i wanted it. On this layer, I then selected the bar which usually says 'Normal' and changed it to either 'Screen' or 'Lighten' (but it is possible to use other tools for this, depending on what sort of image you are planning to create, e.g. dark or light).
  • After this is done, use curves to darken or lighten the image to the right colouring, so that both images are more distinct and easier to see, which will create the Multiple Exposure effect. 

How to edit a Multiple Exposure Image: 


This screenshot is showing the first step - which is opening the photo of a model that you want to use.
Here, I have brightened the background of this image so that it is completely white.
 This screenshot is showing the image that I will also be using for the Multiple Exposure edit.


The images above are showing that I have layered the two images - with the location photo on top. 


In these two images I have shown how you can either choose 'Screen' or 'Lighten' depending on how you want the Multiple Exposure to look. 
 For this edit, I decided to use Lighten.
I then moved the top Location image to the position that I wanted, so that the Multiple Exposure edit looked the way i wanted. 


This was the finished result. 

Thursday, 24 September 2015

Technique Page - Multiple Flash


How to do Multiple Flash:

  • The camera needs to be set to the Bulb Setting, and the aperture needs to be set to F11 depending on the light meter readings. The exposure is how long the button is pressed for whilst taking the photo. 
  • Whilst the button is pressed down, the photographer needs to press another button which sets the flash off as many times, and as fast as they want it too flash. During this time, the model needs to move each time the flash is set off, so that their motion is captured within the image. The slower the model moves, the more stages of movement are captured within the image. 
  • The images can either be taken with a soft box light, or a snoot light (which directs the light to the person's face). 

Thursday, 25 June 2015

Technique Page - Picture within a Picture


Different techniques for Picture within a Picture: 

  • One way to do this, is shown in the first image. Whereby, the camera doesn't move and stays very still, and then one image is shot of just the background, and the other is shot with somebody holding a frame in the center of the shot. Then, when editing, layer the two images on top of each other, keeping the one with the model on top, and then either use the rubber tool or select tool, to rub out or delete the original image within the frame, which should then reveal the background inside the frame. 
  • Another technique is to take multiple photographs of the same photo through a frame, (or duplicate it whilst editing), or take similar photos with the same background but different models holding the same frame etc, and then whilst editing, layering the images on top of each other, but the first image must remain the original size, and then the other images must decrease in size until they appear smaller and smaller. Allowing the same effect as shown above with the phone. 
  • Also, by taking one photograph of someone holding a frame (horizontally), and then shooting a video, you are also able to place the video within the frame to create a moving picture, within a picture. 

Technique Page - Sequencing


Different techniques for Sequencing: 

  • Take multiple images with slight changes, such as someone walking across then frame, one step every time the shot is taken, and then editing the photos into a line or multiple imagery to show the little differences. 
  • Keeping the camera still, using the same background, take multiple photos with slight changes again, but this time the subjects cannot overlap and the camera must not move. Then when editing, layer the photos on top of each other, and rub out certain sections of the photo on top, to reveal the photograph underneath. For example, taking 3 photos of the same person sitting in different positions on a bench, but not overlapping, and then revealing each photo of the person sitting in each position, to show all 3 positions in one photograph. 
  • Another way to shoot sequencing would be to create an Animation. To do this, you would need to shoot multiple images of small movements or changes, which could then be put into animation form, making it look as though the person/subject was moving. 

Monday, 8 June 2015

Technique Page - Minimum Depth of Field


3 factors to do this: 

  • Set the lowest aperture (F5.0 on my camera) 
  • Zoom in 
  • Stand close to subject