

How to do Multiple Exposure:
- As I did not have the use of a camera which had the Multiple Exposure setting, I had to edit the images on photoshop afterwards. Therefore, I took photos of scenery on location, such as trees, bushes, buildings, and then I took photos of models in the studio with a white background (the white background makes the editing in photoshop easier).
- On photoshop, I opened up my two images, one of a model and one of tree leaves for example. I then used 'white point' in either levels or curves on the photo of the model, taken in the studio, this made the background more white and brighter.
- I then pulled the image of the tree over the top of the first image, creating another layer, and positioned it to where i wanted it. On this layer, I then selected the bar which usually says 'Normal' and changed it to either 'Screen' or 'Lighten' (but it is possible to use other tools for this, depending on what sort of image you are planning to create, e.g. dark or light).
- After this is done, use curves to darken or lighten the image to the right colouring, so that both images are more distinct and easier to see, which will create the Multiple Exposure effect.
How to edit a Multiple Exposure Image:


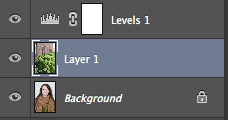
The images above are showing that I have layered the two images - with the location photo on top.


In these two images I have shown how you can either choose 'Screen' or 'Lighten' depending on how you want the Multiple Exposure to look.


I then moved the top Location image to the position that I wanted, so that the Multiple Exposure edit looked the way i wanted.

This was the finished result.
No comments:
Post a Comment