Wednesday 30 September 2015

Work Diary - Multiple Exposure

Evaluation


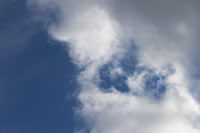
As my camera does not have the Multiple Exposure setting, and I didn't have access to any cameras that did, I had to take the two images I wanted to merge, separately and then edit them together on photoshop later. Therefore, I shot these images with the normal settings of F22, ISO 200 and a shutter speed of 1/125. To do this, I shot in location first, shooting photos of leaves, trees, buildings, the sky(clouds), windows, and then afterwards, I shot in the studio taking portraits of models. On location I also took photos of models, however I soon realised that it would be very difficult to edit with such a busy background, so luckily I shot in the studio afterwards. In the studio, I made sure I shot different angles of my models, such as them facing towards the camera, to the side, looking upwards as well as smiling and not smiling. This allowed me to create lots of different images. To edit, I layered the images on top, making sure the scenery picture was on top of the models picture. I then used 'Screen' or 'Lighten' to incorporate the two images together, and finally using curves to adjust the brightness and colour of the image.


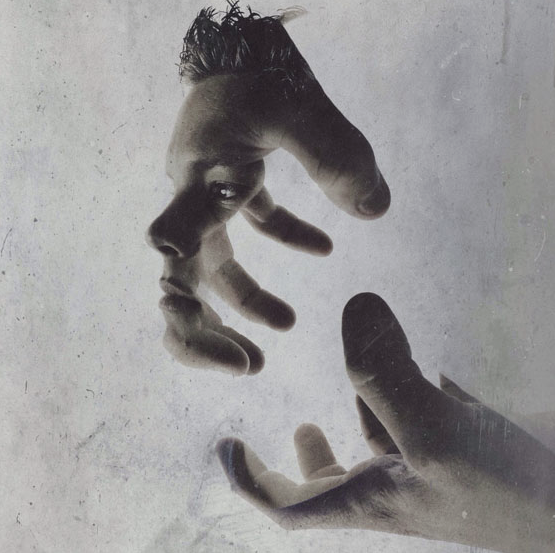
This was my second attempt at teaching myself how to edit a Multiple Exposure image. I am quite proud of the result, as it is clearly identifiable that it is a picture of a girl, with clouds on top. I adjusted the colour using curves, and I like that the blue parts of sky looks like ink splurges, and the clouds look like dusty patches, creating different looks for the model underneath. I also like that the models face is clear, so we can see her as well as the clouds in the second photograph. The only criticism I have for this image is the positioning, as there is quite a big blue patch across the models face.


This is one of the last images I edited, and I decided to incorporate a photo from one of my personal project shoots, which is of the Brighton Eye. I used a picture of the same model, looking to the side. I then again, layered the images and made sure I could see both the models face in particular, and the Brighton eye as well. I like this image because it is very obvious what the photos are of, and I also like that the carriages of the Brighton eye fall along one side of the model, which is also following her hair. I tried to make the centre of the eye fit with the centre of the image of the model, however that would mean it would cover the models face too much, and we wouldn't be able to see much more of the carriages and structure of the Brighton Eye. 

Progression


I would like to demonstrate this technique within my own personal project, which would incorporate my two focuses of 'Identity' which are places/buildings and people. As I could use a photo from one of the shoots that I take in a place - like the Brighton Eye one above, and then put that with a portrait of a model or a self portrait. I would also like to use this technique with other images, like using photos based on texture or layering photos of people upon a person's face, or layering two faces on top of each other. 

Technique Page - Multiple Exposure


How to do Multiple Exposure:


  • As I did not have the use of a camera which had the Multiple Exposure setting, I had to edit the images on photoshop afterwards. Therefore, I took photos of scenery on location, such as trees, bushes, buildings, and then I took photos of models in the studio with a white background (the white background makes the editing in photoshop easier). 
  • On photoshop, I opened up my two images, one of a model and one of tree leaves for example. I then used 'white point' in either levels or curves on the photo of the model, taken in the studio, this made the background more white and brighter. 
  • I then pulled the image of the tree over the top of the first image, creating another layer, and positioned it to where i wanted it. On this layer, I then selected the bar which usually says 'Normal' and changed it to either 'Screen' or 'Lighten' (but it is possible to use other tools for this, depending on what sort of image you are planning to create, e.g. dark or light).
  • After this is done, use curves to darken or lighten the image to the right colouring, so that both images are more distinct and easier to see, which will create the Multiple Exposure effect. 

How to edit a Multiple Exposure Image: 


This screenshot is showing the first step - which is opening the photo of a model that you want to use.
Here, I have brightened the background of this image so that it is completely white.
 This screenshot is showing the image that I will also be using for the Multiple Exposure edit.


The images above are showing that I have layered the two images - with the location photo on top. 


In these two images I have shown how you can either choose 'Screen' or 'Lighten' depending on how you want the Multiple Exposure to look. 
 For this edit, I decided to use Lighten.
I then moved the top Location image to the position that I wanted, so that the Multiple Exposure edit looked the way i wanted. 


This was the finished result. 

Work Diary - Slow Sync Flash

Evaluation

This shoot was alongside the High Key Lighting shoot. As a class, we split into two groups and used two different backdrops, one white and one black. The black one was for Slow Sync Flash. This technique enables a photographer to capture a subject's movement, in the form of a blur. In this session, we used each other as models and chose different movements such as jumping, walking across the screen, dancing and also using two or more people within one shot. To do this, the shutter speed of the camera has to be longer, but we varied the lengths from 1-4 seconds depending on how much blur we wanted in the image, F16 and ISO 200. Due to only being able to set up two shoots, the groups were quite big which meant that we weren't able to shoot as many images as we would have liked individually. This is the lighting diagram for this shoot:


This photo is the first one I took, whereby I asked my model to 'star jump' into the air. I particularly like slow sync flash because it captures the subject within a still image first, then captures the blur depending on the motion. Therefore, in this image we can see the model standing still, and in comparison can also see her jumping in the air in the background. If i was going to recreate this image, I would try to capture a more distinct blur and to do this, I might ask the model to jump to the side instead, so that the blur appears next to her, not behind. 


This is the second image I took, which I'm actually quite proud of. To do this, I asked my original model to stand still, and then asked another model to walk from behind her and around to the front. Although the blur didn't capture the whole movement of the second model, it did create an incredibly coloured blur to the side of the first model. We can also see the head of the second model, which is in clear focus like the first model, and this shows that he walked out from behind her. I particularly like that we can see a colour difference in the blur, the top part being orange-red where the second models head appeared from, and below that it is yellow. I also like that the blur swifts over the first models face, so we can see that the second model did walk past her. I didn't crop this image because I liked the black, dark right side in comparison to the colourful left side. 

Progression


If I were going to use this technique within my personal project, I would like to test it out on Location, as it would be a good technique for capturing cyclists, people walking/running, cars driving past or trains moving along. I like that the still image is kept in focus, so we can see what the blur originally was to begin with. I could also re-shoot in the studio, and try to take better images, or even use this technique to blur over people's faces - which would coincide with my identity topic.

Monday 28 September 2015

Straight Images - Multiple Exposure


Mindmap - Personal Project (Identity)


Work Diary - Multiple Flash

Evaluation

In this lesson, we worked as groups within the studio. Beforehand, the studio was set up so that we were able to take our own individual multiple flash images. Firstly, the camera needs to set up to the bulb setting with an aperture of F11 (depending on the lighting). The exposure of the camera depends on how long you want to hold the shot button down for. Whilst shooting the image, with the button pressed down, the photographer then has to set the flash off as many times as they would like during this time. This allows for the movement of the model to be captured in a single image. There are different kinds of lighting which can be used for this shoot, for instance either a soft box light, or a snoot light (which specifically directs the light to the person's face). As the groups in the class were quite big, we were only able to take a few images at a time, however I did manage to create a few photographs which definitely show movement. I enjoyed this shoot because it was organised, and the technique was new. This is a lighting diagram of the set up in the studio, I used two soft boxes:


This is the image which I am most proud of from this shoot, as it was the first time using this technique as well. To do this, I asked my model to move her arms up, incredibly slowly so that I was able to capture every stage. Whilst my model was doing this, I set off the flash as many times as I could during that time frame - and until the model's arms reached the top. I shot this photo twice, but in the first one, i didn't like the positioning of the arms, as I think my model moved too quickly - but also, the top of her arms were cut off when she reached the highest point, so the second time I had to lower the camera and make sure my model pointed her hands once she had reached the top.


I also really like this image, although it isn't one of the best, I like the dark to light transition from left to right. This gives the photo a sense of journey and mystery, as it appears that the model is dancing out from the dark into the light. I also really like that in the third shot the model's body is cut off, so that it looks like she is walking out of the frame. To do this image, I asked my model to spin along the length of the shoot, and set the flash off slowly. I really like that this image has captured three full images of the model.

Progression


If i were going to use this technique within my personal project, i would have to plan and create ideas about what i'm going to shoot beforehand, so that i knew which lights, how many flashes i needed to take within the shot, and how long i would need to hold the button down for. This is so i could shoot as quickly as possible and know what i'm doing. I would also like to learn how to set up the camera and studio so that i could do it for myself. As well as a studio shoot, i would like to try this technique in location so that i could capture people moving within a different setting, and naturally - which would fit more into my personal project.

Friday 25 September 2015

Work Diary - High Key Lighting

Evaluation

For this shoot, we worked as a class with two separate shoots going on at the same time, high key lighting and slow sync flash. The camera was set to F16, ISO 200 and a shutter speed of 1/125. For the high key lighting shoot, we used a white background, and positioned 2 lights behind polystyrene walls, and reflected them onto the background, and the other two lights were reflecting on the subject. This is so we get a complete white background, with softer shadows so there are no harsh dark areas. I used a model for this shoot, and made sure I used the entire frame when shooting. I also took landscape and portrait images, as well as shot just the models face, and some included their shoulders/torso. The photos I produced were bright, and when we increased the exposure they were even brighter - however I didn't like the effect this had, as it lightened the models face too much. This is a lighting diagram of the set up:


This is one of the best images I took during the shoot, as I have filled the frame as much as I can and have also centered the model. I like that this technique brightens the white background, as it increases the colours of the model such as their hair and clothes. This makes the model stand out more. This technique would be especially good to use for portraiture, fashion and beauty shoots as it enhances colour and focuses the attention on the model as the background is completely blanked out. 


This is one of the images I took after increasing the exposure on my camera, after editing, I like this photo a bit more. However the over exposure has caused the models skin to look yellowish, which isn't a very good effect, particularly if shooting for portraiture/fashion/beauty as the model would want to look their best. However, this effect does increase the brightness of the background even more than the photo above, which makes the model's less noticeable features stand out more such as their eyes.

Progression 


I'd like to use this feature in my personal project for portraiture, as it enhances the features of the model, but also makes their face look softer and more natural, particularly as it counteracts the harsh shadows which could appear if the lights weren't positioned to reflect on to the background. I would also like to experiment with the increased exposure, as I would like to know what sort of photography it would be good to use for, as when using it to shoot people, it washes them out. 

Thursday 24 September 2015

Contact Sheets - Multiple Exposure


Contact Sheets - Multiple Flash


Contact Sheets - Slow Sync Flash


Contact Sheets - High Key Lighting


Image Bank - Multiple Exposure


There are two ways to create a Multiple Exposure image, either by camera technique or editing skill. The idea is to merge two or more images together - such as a person's face and plants or buildings etc. which the examples above show. However, with the use of creativity, some photographers are able to bend the rules and create something different. For example, the third image uses a models arm/hands as the base image, and then within that they have either shot or edited a person's face within the shape of the arms/hands. They have also merges a picture of tree leaves at the bottom of the arms, to create the illusion of them blending into the picture. The last image also uses a photo of hands as the base images, but this is an example of a double exposure photograph, as only two photos have been used. The photographer has merged a picture of a man's face within the hands. I particularly like this image because the configuration of the hands set up the shape and size of a head. 


Technique Page - Multiple Flash


How to do Multiple Flash:

  • The camera needs to be set to the Bulb Setting, and the aperture needs to be set to F11 depending on the light meter readings. The exposure is how long the button is pressed for whilst taking the photo. 
  • Whilst the button is pressed down, the photographer needs to press another button which sets the flash off as many times, and as fast as they want it too flash. During this time, the model needs to move each time the flash is set off, so that their motion is captured within the image. The slower the model moves, the more stages of movement are captured within the image. 
  • The images can either be taken with a soft box light, or a snoot light (which directs the light to the person's face).