In this lesson, we shot both Wide Angle and Close-up together as we didn't have a lot of time left. Therefore, I had to switch from the two different techniques. For wide angle photographs, I used a low zoom, but stayed close to the subjects of my images, for example: a persons face, a bench, a wall. This created depth as it made the closest part of the image look bigger, in comparison to the part furthest away, which appeared smaller. For close-up images, I had to switch to the close-up setting on my camera, and again, stay close to the subject. I focused on flowers and nature as they are quite easy to shoot close-up. The wide angle shoot was probably the hardest out of the two, as it was difficult to figure out which subjects were best and if I was shooting it correctly, however I did manage to capture a few photos which showed incredible depth.
These two images are from the wide angle shoot, as you can see, the closer to the lens a part of the subject was, the bigger it appeared. Such as the models nose.
These two images are from the close-up shoot. I particularly like that the subject is the only part of the image which is in focus, as the background is blurred. Making the flower and the tree stand out in detail.
Progression
Although the wide angle photos were the most difficult in this joint shoot, I did enjoy both techniques. After researching into the techniques and creating image banks, I have now seen more variations and styles on how to use them, which has influenced my own ideas. Therefore, I hope that if I get the chance, I will use these techniques in my own project.
Minimum Depth of Field was a new technique which we learned in this lesson, whereby you have to use the lowest aperture on your camera which for me was F5.0, zoom into the subject but also stand close to it. At first, we all had to adapt the settings on our camera in order to take these photos, and then we had to practice shooting this, in groups, along with other techniques. I was only able to shoot one Minimum Depth of Field photo, which I really like. I enjoyed the technique, shooting and also plan to use it in the future.
This is the one image I was able to take using the Minimum Depth of Field technique, the subject is the only part of the image which is in focus, as the background is blurred.
Progression
If I were to re-do this shoot, I would attempt to take more photos using the technique, but also with different subjects and different positions (left, center, right). I liked this technique a lot as it allows the main focal point to stand out among the background, no matter how busy it is because it is blurred. I hope to use this technique wherever possible in my project as I like the style, and enjoy shooting it.
In this lesson, we were introduced to the idea of a picture within a picture. Again, we completed the Image Bank first, which gave us influence for our own ideas. We then used three different techniques to create three different photographs. Firstly, I shot four different images, each with a new model holding the same frame, in the same position in the center of the image. I then edited this photo so that the first person in the first images, was holding a frame with the next photo I took of the new model, and so on. So that the last person is the smallest picture in the photo, within the frame. The second technique was to keep the camera still, on a tripod and shoot a photo of a background, and then shoot the exact same photo again, but with a model in the center of the image holding a frame. With Photoshop, I then selected and deleted the space within the frame, to reveal the background, which creates the illusion that we are looking straight through the model's body. Finally, we then shot one image of a model holding the frame horizontally, and then shot a video, I chose to do a slow video of the same model, starting with his feet and travelling up to his face. We then edited these videos into the space of the frame, creating a moving picture within a picture. My camera was set to ISO 200, F22 and a shutter speed of 1/125.
For this image, I used 4 different models, and structured the portraits of each model so they all stood the same, as well as looking straight at the camera, and also holding the frame vertically. This is because, whilst editing, I then used these separate images and put each picture within the frame, one by one, until 3 of the photos were in the frame of the first photo, so that the picture is within a picture 4 times over. This makes the photo so much more interesting, and it is also clever because you cannot see that the pictures are exactly the same, just with different models, until you zoom in to where the frame is. Also, I like that the frame is held in the centre of the image, so that it becomes the main focus of the whole photo, indicating that it is the most important part of the image.
For this photo, I used the same technique for the photo above, except I asked my model to stand in front of a brick wall so that it became the background. I also shot a photo of the brick wall, without moving the camera at all as I had to keep it still, without the model so that I could edit the brick wall pattern within the frame later. Using photoshop, I layered the two photos with the model, and without the model, so that I could crop the correct part of the image that aligned with the brick wall, behind the model, with the part of the brick wall in the image without the model. This makes the final image look as though the brick wall is being shown through the models body. Again, the frame was held in the centre so that it becomes the main focal point of the image. I also like that the frame has a bold, black outline so that it really emphasises the picture within it.
This is the image/video we shot after the two photos above. For this, I shot a simple image of my model, keeping his entire body within the shot, but asked him to hold the frame horizontally this time as it makes placing the video into that part of the image a lot easier. After I had shot this, I then used the video setting on my camera to shoot a video. For this, I started from the same models' feet, and video'd from his feet upwards towards his face, in a panoramic style. This is now a youtube clip.
Progression
If I were to recreate these images, or shoot again I would use a bigger frame so that more space was covered for the images to be put into, showing more of the photos inside. The only new technique for this for me, was the moving picture image. As I have used the other two techniques before in another unit. However, I enjoyed expanding my knowledge and using the techniques again, but particularly enjoyed learning about video and the moving picture image. I would like to use these techniques within my project if possible, as they are really creative and interesting.
In this lesson, we completed the Image Bank for Sequencing before actually going out to shoot, which gave us an idea of what Sequencing was, and how we were going to take Sequencing photos ourselves. We shot in groups, and used three different techniques. The first technique was to use the rest of our group to create a still image sequence, therefore I organised my models into a line, and then in each shot, I asked two of them to swap places. In the first and last images, the models are in the same positions so that it shows the sequence has begun, and ended. Whilst editing, I then used a multiple imagery technique, but placed the images in a horizontal line. The second technique we used was an animation. For this, I asked one of my models to do a somersault on the ground, and whilst he did so, I used the continuous setting on my camera so that I was able to capture multiple images within a couple of seconds. I then created the animation, and also played the frames backwards so that in the animation the model somersaults forwards, and then backwards into the beginning position. The final technique we used, was to take a minimum of three images, of the same model in different positions on a bench. For this, we had to keep the camera extremely still, and in the same position. In Photoshop, I then layered the three images on top of each other, and then rubbed out the top image so that I could see the other two photos as well, creating the illusion that there are three clones of the same model, in different positions in one image. This was incredibly fun and a completely new technique which I enjoyed learning, and hope to use in the future.
These are the two still images I produced within the lesson, as described above. Using the first and last techniques we were taught.
Progression
If I were to continue with this technique, I would increase the complexity of the images by using more models, or creating another animation with a faster shutter speed so I captured more photos within the second. I would like to use all three techniques within my project somehow, as they are extremely interesting and creative. I particularly liked using animation, as that was completely new to me. I also really like the 3rd technique, of more than one of the same model in one photo, as that makes the photo far more unusual and interesting to look at.
Different techniques for Picture within a Picture:
One way to do this, is shown in the first image. Whereby, the camera doesn't move and stays very still, and then one image is shot of just the background, and the other is shot with somebody holding a frame in the center of the shot. Then, when editing, layer the two images on top of each other, keeping the one with the model on top, and then either use the rubber tool or select tool, to rub out or delete the original image within the frame, which should then reveal the background inside the frame.
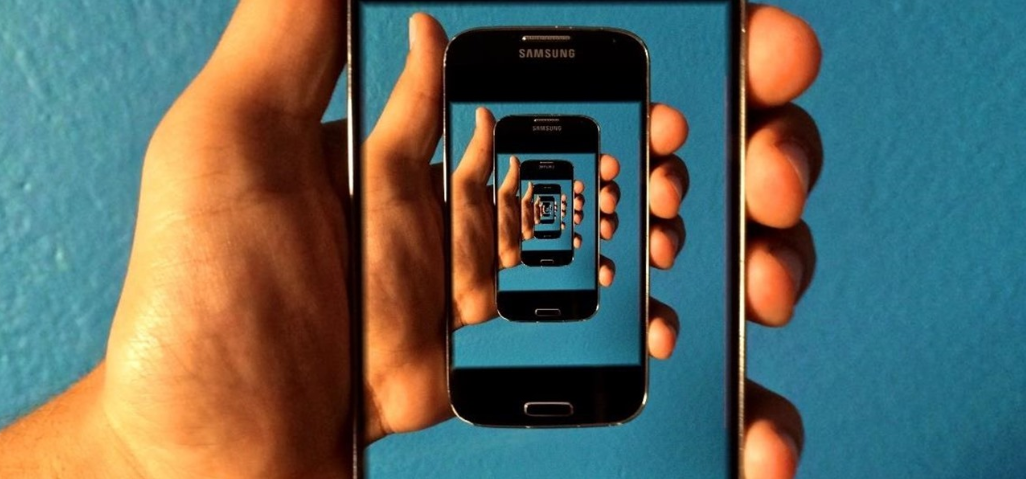
Another technique is to take multiple photographs of the same photo through a frame, (or duplicate it whilst editing), or take similar photos with the same background but different models holding the same frame etc, and then whilst editing, layering the images on top of each other, but the first image must remain the original size, and then the other images must decrease in size until they appear smaller and smaller. Allowing the same effect as shown above with the phone.
Also, by taking one photograph of someone holding a frame (horizontally), and then shooting a video, you are also able to place the video within the frame to create a moving picture, within a picture.
Take multiple images with slight changes, such as someone walking across then frame, one step every time the shot is taken, and then editing the photos into a line or multiple imagery to show the little differences.
Keeping the camera still, using the same background, take multiple photos with slight changes again, but this time the subjects cannot overlap and the camera must not move. Then when editing, layer the photos on top of each other, and rub out certain sections of the photo on top, to reveal the photograph underneath. For example, taking 3 photos of the same person sitting in different positions on a bench, but not overlapping, and then revealing each photo of the person sitting in each position, to show all 3 positions in one photograph.
Another way to shoot sequencing would be to create an Animation. To do this, you would need to shoot multiple images of small movements or changes, which could then be put into animation form, making it look as though the person/subject was moving.
In order to take a close-up image, the camera needs to be on the 'close-up' setting, and then the camera must be as close to the subject as possible. These images are prime examples of this technique. I've chosen different images with different subjects to display close-up's of texture, colour, water etc. The two flower photos are similar to images that I have already taken when shooting close-up myself. However, the other images have all influenced me to experiment with this technique later on in my project. I particularly like the first image, as we can see that the water droplets on the apple are actually 3D, because it is so close-up. I also like the very last image, of the ladybug as we can see incredible detail, such as the texture of the person's fingertip and of the ladybirds body. Close-up images allow for precise detail to be shown. I like all of the images above, as they are all so different but use the same photographic technique.
The images above all display 'wide angle', whereby the photographer has kept the lowest zoom, but has moved the camera lens closer to the subject, making the actual closest part of the subject, look the biggest in the image. Some of the photos, such as the second to the last one of the girls face, the first, of the cow, and the fourth image of the little boy, I have attempted to recreate as when I was shooting wide angle, I mainly focused on peoples faces, and I also took a photo of my feet from high up. However, the other images, of the bridge, Eiffel tower and particularly the very last image, have given me inspiration. I especially like the last image of the 'bigger hands' because it is so unusual and creative, but still simple. Wide angle images can also make certain parts of the image look smaller, as the majority of these images show depth, and therefore the part furthest away from the camera lens, will appear the smallest - such as the little boys feet in the fourth photograph.
Each of the images above represent minimum depth of field, whereby the photographer has set the lowest aperture on their camera, zoomed in and stood close to the main subject in the photo. I chose as many different subjects as I could find, such as flowers and people. I also chose photos which had different zooms, as some of the subjects are closer than others. I particularly like the flower photos because the blurred background makes the colour of the petals stand out brighter. I also really like the 'christmas themed' photo, as the fairy lights on the tree makes the blurred background so much more interesting and colourful, and also gives the photo a festive feel. In the last two images I've chosen, the main subject is a person, and in both the model is placed in the left side of the frame, which allows a lot of the background to be shown - making it obvious that it is blurred.
The photographs above present multiple photos, within an original photo. There are a few techniques to do this, such as using a frame or a mirror. The image within the image, can be the background, another photo or a video. In the first image above, the photographer has edited the original image so that the face and upper body of the model has disappeared, leaving just the background showing within the frame, as though we are looking through them. The second, fifth and final images I have chosen show multiple images within one image. The last photo above shows various photos of the model holding the frame, in different positions. The final image which is the smallest frame in the original photo is a closeup of the models face. The other images I have chosen simply show another photo through the frame in the original image, like the married couple standing together. In the other image which is similar to this, it looks as though everything outside of the frame is moving, apart from the actual photo within the frame, which is completely in focus.